Grilled Onions w/ Pomegranate Molasses


Pomegranate molasses (also called grenadine molasses) is a staple in the countries of the Middle East and the Eastern Mediterranean. I recently discovered this syrup whilst trying to replicate this roasted red onion side dish which often accompanies meals in Turkish Restaurants here in London. I was surprised at how sour and tangy the molasses was given the sweet dry taste of a pomegranate. I would only recommend buying a small bottle at first (which can be purchased from most Middle Eastern shops).

Once you get use to its flavour, I think it will become a stable in your pantry. You can use it as a substitute to honey for glazing meat, poultry or roasted root vegetables like carrots. But traditionally it’s used as a dressing in salads or relishes. To achieve the sweet and sour taste here, I added fresh pomegranate juice to take the edge off the molasses.


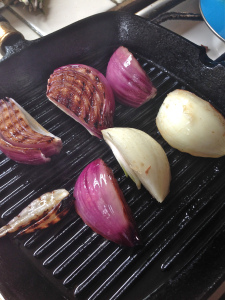
Grilled Red Onions w/ Pomegranate Molasses

  • Servings: 4-5
  • Print

Ingredients:

2 red Onions 1 white Onion cut into quarters.

Sunflower Oil Spray (for the grill)

2 Garlic Cloves

2 tbsp  Pomegranate seeds

1/2 cup Pomegranate juice

2 tbsp Pomegranate Molasses

Pinch of salt/ pepper


Method:

1. Put the grill pan on a high heat for about 3 minutes, then spray with oil.

Place the onion quarts on the grill for about 3 minutes per side or until it is well caramelized.

IMG_8278

2. Once both sides of the onion have been grilled, break up the segments to allow the onion to soften a little more.

3. Remove from the grill and leave the garlic on the grill to roast some more. Once soft remove from grill and mash with a fork.

4. In a separate bowl, mix the pomegranate juice, molasses and garlic.

When you are ready to serve, strain the juice through a sieve to remove the garlic and pour over the onions.

Add the pomegranate seeds as a garnish.

5. Serve as a condiment or with warm flat bread.


Advertisement

One Pot Series: Guyanese Metemgee


The One Pot Series: If you want to spend less time washing dishes and more time enjoying tasty food and company, then read on!

Coming from a family of six hungry bellies with large appetites, The One Pot was essential for our survival. I really don’t know how my parents managed without it. From Cook-up Rice to Metemgee, it just made economic sense; It settled many an argument, it brought order out of chaos, it quieted the storm. “You don’t like Cassava? Well there’s sweet potato..” The way Mum would organise the provision before my brother could stab me in the hand with his fork, his true target being the last piece of dumpling, was genius.  And then there’s the sauce…my word. My word. It can only be compared to liquid gold: the pot would be clean and gleaming when we were done.

Metemgee  is a Guyanese Creole stew of sorts made with dumplings, cassava, yam, plantains, okra and a hot peppery coconut milk sauce. It’s normally served with salt fish or crispy fried fish of your choice. The immense amount of sauce that the Metem provides means you really don’t need to prepare a separate gravy with the fish.

You can add any number of root vegetables to it: potatoes, edoes, white or yellow yam. It’s up to you. Just be sure you maintain a thick rich sauce throughout, the dumplings once added will help with that.

It’s always best to cook this dish in stages as some things cook quicker than others; the Okra and Plantain for example should be cooked last and separately as they soften quickly and you want it to keep its shape.

And finally don’t judge a book by its cover. When this dish begins to cool down, it may look like a hot mess, but the smell from the stew is so rich, you won’t be turning your nose up for too long! As it’s coconut milk the dish won’t last beyond 2 days before turning sour, so be sure to only cook want you know you will eat over the weekend!

Guyanese: Metemgee

  • Servings: 6
  • Difficulty: easy
  • Print


Ingredients:

2 Sweet Potatoes

1 whole Cassava (or 5 frozen pieces)

2 Ripe Plantain

6 Okra Fingers

2 Corn on Cob

1 Medium Onion - chopped finely

3 Garlic - crushed

3-4 Fresh Thyme sprigs or good pinch of dried Thyme

1 Whole Scotch Bonnet Pepper

2 spring onions, sliced

1/2 tsp salt

1 tsp tomato paste

1 tbsp of freshly grated ginger

1 1/2 cups Coconut Milk

Dash of Maggi all-purpose liquid seasoning

1 tsp Garam Masala

1 Vegetable Stock cube

1/2 tsp Red Pepper Corns

1 1/2 cup Water

Oil (to fry)


For the Dumplings

2 cups of plain flour

1 pinch of salt

1 tbsp butter/ margarine

1 cup milk


Method:

1. Peel all the root vegetables and slice length ways into 7″ long chunks. Try not to slice them too thinly as they may disintegrate whilst cooking. Place the vegetables in a large bowl filled with cold water.

Make the dumpling by mixing all the ingredients listed under ‘dumplings’ together. Shape the dumplings as you wish and refrigerate for later.

2. Cut the ripe plantain into 3 chunks (with the skin on) and place in a separate pot of water to boil.

3. Trim the Okra ‘top and tail’ and set aside.

4. Fry the onions, garlic and spring onions in a large, deep pot for about 3 minutes before adding the tomato paste and ginger. Allow it to fry until the onions have softened.

5. Add Garam masala and stir for 1 minute before adding the coconut milk. Allow to simmer for 1 minute before adding the thyme.

6. Add the water and scotch bonnet pepper to the pot. Then place the root vegetables in the pot. Allow pot to simmer for 10 minutes before removing the pepper.

7. Add the vegetable stock cube and season further to taste.

8. In the meantime, in another pot, boil the plantain. This should take no more than 15 minutes. strain the water and allow it to cool.

9. Allow the pot to simmer until the potatoes start to soften. Then add the dumpling pieces and okra, placing them gently at the top of the stew, be careful not to stir the pot too much.

10. Season to taste.


Bara and Channa (Doubles)

Yes Bara and Channa: the original street food of Trinidad. I soon learnt on my first trip to Trini, not to buy Bara and Channa from just anyone!

My Dad and I still laugh about it to this day how we would drive 45 minutes away from my Uncle’s home, in the south, to buy fresh bara (bread) and channa (chick-pea) from a middle aged lady who made it straight from her isolated hut, passing many other vendors along the way. This lady’s bara was made right before our dry eyes and watering lips rather than fried beforehand and left to steam in a hot pan waiting for the first customer. The best bara is slightly crispy on the outside and fluffy in the middle with a mild curry flavour.

This wouldn’t be a true hot sandwich without the condiments: the Anchar (pickled mango chutney), the tamarind sauces and the cool cucumber salad. If you follow this recipe correctly, you will also have the most lightest fluffiest bara you could ever want: easy to slice into a pocket or sandwich two bara’s together with a serving of curried channa, hence the name ‘doubles’.

It’s a messy sandwich to eat at times, but that’s all accepted as no compromise is made on taste! It’s quick, tasty and your sure to have another (doubles!) Ok here endeth the puns!

Bara and Channa (Doubles)

INGREDIENTS

Bara

2 cups strong white bread flour

1/2 tsp Salt

1/2 tsp Turmeric

1 tsp instant yeast

1/3 Cup warm water

1/4 tsp Sugar

Oil for frying


Curry Channa

1 tin of Chick Peas (keep the salted water for later)

3 cloves Garlic crushed

1/2 medium Onion - grated

2 Spring onions - finely chopped

1 tbsp of Sweet red pepper (finely chopped)

1-2 tbsp of Patak’s Madras Curry paste (or Chief Curry Powder)

1/2 tsp of Cumin powder (Geera)

1 tbsp Olive oil


Cucumber Chutney 1 Cucumber - finely sliced

2-3 Garlic cloves

Juice of 1 Lime

1/2 tsp of Scotch bonnet pepper

1/2 tsp Brown sugar 1-2 tbsp of freshly chopped Coriander.


‘Tambran’ Tamarind Sauce see recipe here


METHOD

Bara

In a large bowl combine the flour, salt, turmeric.

  1. In a separate small bowl place the warm water, sugar and yeast, stir and leave to foam for 5 minutes.
  2. Add the yeast mixture to the flour to make a slightly firm dough.
  3. Knead it for 3 minutes and then place in an oiled bowl, covered with a damp cloth and allow to rise for 1 1/2 hours (in a warm place preferably, not in direct heat).
  4. When the dough has risen, take the dough and punch the air out of it on a floured surface.
  5. Divide the dough into 8-10 pieces and then shape each piece into a tight ball. Again place the dough balls under damp cloth and let it rest for 15 minutes.
  6. Then with a bowl of warm water, moisten your fingers take a dough ball and flatten it to a round base, 4 or 5 inches in diameter.
  7. The dough should still be moist at this time. You should be able to fit only 3 in the frying pan to give you an idea of their size. Take a frying pan and fill it with 2″ of oil. Heat the oil to a medium - high heat. place 3 of the bara’s in the oil, it should take no more than 30 seconds to cook each side, the bara. Place the bara in a warm oven will you fry the rest.


Curry Channa

  1. Take the onions, garlic and red pepper with the oil and fry gently in a saucepan. The onion may take a while to fry, as you have grated it and so some of the water would have to dry out. This should take 2 minutes.
  2. Then add the curry paste or powder, cumin, lower the heat and fry with the onions for 1-2 minutes.
  3. Then add the drained chick peas to the curry mixture and stir the peas in so that the curry coats the peas completely. Allow it to cook for 2-3 minutes.
  4. Then slowly add the chick pea water, you may not need all of it, just enough to get the right consistency, I used about 3/4 of the water. Season to taste. Allow it to simmer slowly for another 5-8 minutes.


  1. Cucumber Chutney Take all the ingredients, grated, crushed and juiced, stir them lovingly into a bowl. Season to taste if necessary.


Copyright 2015 – all rights reserved.

Trini ‘Tambran’ (Tamarind) Sauce’

I remember being about 6 or 7 at the time (for some reason I put a lot of childhood events between this age range) when I tasted my first Tamarind Ball. It was dark in colour and resembled a golf ball that had been rolled in sugar. My brother told me it was (pepper) ‘hot’, so as neither of us could bear hot pepper at the time I avoided them as best I could.

But then a few weeks later, I thought I’d pluck the courage to go try one of these ‘sweets’ as my Dad called them. He had brought them back from a short trip he’d made to Trinidad to see my Grand - parents and extended family. I had watched on with envy as my Mum and Dad devoured them with child like pleasure all week and couldn’t understand the fascination with something that resembled liquorice but tasted like pepper.

The moment the Tambran was in my mouth, I was met by an unusually sweet sticky texture which I chewed on for a couple of seconds, before coming across the odd black seed (which I guessed had been missed). Then came the pepper of fire, which turned out to be more like a tickle rather than a punch in the mouth; it was over before I knew it. I loved them!

From then on I void never to follow my brother’s advice (in relation to food) ever again.

The recipe below is for Tambran sauce, I thought it would be better to share the sauce rather than the sweet/savoury balls with you because it’s a very versatile sauce which can be added to a number of sweet, savoury dishes or even drinks!

I’ve used this sauce in the Bara and Channa which is joining the blog soon, and hopefully I’ll share a drink with you too! Enjoy

Nutritional Value: 

Each 100 grams of tamarind contain 36% of the thiamin, 35% of the iron, 23% of magnesium and 16% of the phosphorus recommended for a day’s worth of nutrition. Other prominent nutrients include niacin, calcium, vitamin C, copper, and pyridoxine.

'Tambran' (Tamarind) Sauce

  • Servings: 10-20 servings
  • Difficulty: easy
  • Print

Ingredients

10 sweet tamarinds, shelled and de-seeded

2 to 3 cups water

1 tbsp brown sugar

1 pinch of salt

2 cloves of garlic - crushed

1/4 medium onion - grated finely

1/2 tsp scotch bonnet pepper - chopped finely (or more!)

Method

Once you have removed the shell from the tamarind, rinse the tamarind under running water (this is to make sure any bits of the shell still on the fruit are completely removed.

You will see a boney like membrane running along the fruit, remove that too if possible, otherwise, transfer the tamarind a saucepan. Pour into the saucepan, two cups of water and bring the pan to a fast boil, you will see the tamarind begin to dissolve, you can help the fruit separate from the seed by mashing it with a potato masher. If the liquid starts to thicken, add more water and lower the heat. This should take 5 -7 minutes.

Take the tamarind off the heat, pour the mixture through a sieve into a bowl, leaving behind the husk and the seed. You want to add the husk to the remaining sauce and discard the seed. Now return the tamarind sauce to the saucepan.

In the saucepan, add the remainder of the ingredients and bring it to a medium boil to help thicken the sauce. Once the sauce is at the consistency you want, allow it to cool and store in sterilised jars in the refrigerator.

West African Peanut Stew


Thick, thin or soupy. Depending on where you are, peanut stews can be found across the whole of West Africa. This is one dish I really wanted to get right, it had to be as authentic as I could possibly get it without having to grind the peanuts to make butter myself. This dish is usually made with chicken, but as someone who is attempting but failing badly to wean off meat, I thought I would try and make this with vegetables.

The question was, which vegetables to use and to combine. My choice was based on several factors: texture, colour, and combination. As I would be missing meat, I had to make up for that with giving the stew something to chew on. No one likes over-cooked discoloured vegetables, well I don’t and so I needed vegetables that could hold their form, or at least help thicken the stew. I decided against courgettes for that very reason: they tend to get very watery when cooked and lose both colour and texture. Aubergines on the other hand taste better when they melt away into a pulp, especially helpful for this thick sauce. And then the small black flecks of eggplant skin still shine through the soup.

Then in honour of this stews ‘roots’ (sorry for the pun), sweet potato was an easy choice, it forms the ‘meat’ of this stew. The mushrooms also help to add a depth of flavour and save you having to add a heap of water to the dish, you want a fairly intense sauce.

Try and keep the vegetables as chunky as possible and add them in stages, I added to green sweet pepper, right at the end when all was said and done (i.e. cooked) for example as again I wanted to retain the bright green colour and crunchy texture. You will really enjoy this with the coconut and lime rice also on the blog…happy cooking!

West African Peanut Stew

  • Servings: 4-5 servings
  • Difficulty: easy
  • Print

Ingredients

1 large (orange flesh) Sweet Potato - cut into chunks
1 large Aubergine - cut into cubes
1 cup mushrooms - roughly chopped
3 spring onions - cut into 2 inch pieces
1/2 medium onion - chopped finely
1 tbsp grated fresh ginger
1 cup of chopped plum tomatoes (and juice)
1/2 medium green sweet pepper- chopped 1″ squares
4 garlics crushes
3 sprigs thyme
3/4 cup peanut butter

To Temper

1 tsp tumeric
1 whole scotch bonnet
1 tsp cumin
1/2 tsp black pepper
4 whole cloves
1 tsp cinnamon
1 tsp fenugeek powder
1 tsp corriander powder
1/2 tsp cumin powder
1 tsp of Asafoetida

salt to taste
Roasted peanuts (garnish)

Method

Heat 3 tbsp oil in a large pot. Add the chopped aubergine to the pot and let it cook for about 5 minutes stirring frequently. You can cover the pot with a lid, lower the heat and allow the juices from the aubergine to soften it. When its cooked, take it out the pot and set it aside.

In the same pot, add 2 tsp of oil and all the ingredients under ‘to temper’, fry gently under a medium heat for about 30 seconds. Then add all the onions, garlic and thyme the temper and fry until the onions have softened. Then add the mushrooms followed by the aubergine and all it to cook gently.

Then add all the remaining ingredients to the pot except the peanut butter: you want to dissolve the butter in some hot water first to help distribute it. Then add the peanut butter to the pot with all the other ingredients (except the green peppers). Cook under a medium heat, stirring occasionally for about 20 mins or until the potato is cooked.

Season to taste. Serve with rice

Quick Black Grape Jelly


So simple and sweet.Serve with homemade Brioche. The same recipe can be used for Blueberries, Strawberries or Blackberries. The options are endless!

Black Grape Jelly

  • Servings: 20
  • Difficulty: easy
  • Print

1kg black grapes, preferable with seeds (stripped from the stalks)
350g jam sugar (with added pectin)
juice 1/2 lemon

Utensils: wooden spoon, a sieve and sterilised jam jar.

Place the grapes into a large saucepan over a low heat, then cover and leave to cook for 5 mins or until the grapes start to disintegrate. Take a potato masher or fork and mash-up the grapes to extract more of the juice.

Leave to cook for about 10 mins more, mashing every now and again until the grapes are falling apart.

Take a sieve over a bowl and pour the grapes into the sieve, help extract the pulp from the skin by gently pushing the grapes through the sieve, you should be left with a thick liquid in the bowl (about 2-300ml).

Then pour it into a pan along with the sugar and lemon juice. Set the pan over a high heat and bring to the boil. Let the mixture bubble for 5-6 mins.

To test it to see if it’s ready, place  a small plate in the freezer for 5 mins, take it out and then pour a little of the juice onto the cold plate.

After 1 min, run your finger through; if the jam wrinkles slightly, it’s ready. Pour the hot jam into a sterilised jar. Will keep unopened for up to 3 months.

Spring Salad Series: Fennel with “Ranch” Dressing


I had a spring in my step last weekend. For the first time in about 5 months or more, the first signs of Spring began to emerge. The most noticeable effect of this glorious beam of sunshine and clear blue skies, is actually waking up happy. Seriously it’s as simple as that: when you have spent the last winter waking up and working and going to sleep practically in the dark, it’s like someone literally flicked a switch on in a dark damp room: suddenly everything is clearer and looks attractive.

London feels like a welcoming place again. Another noticeable change is my appetite. I don’t know about you, but it’s a lot easier to eat and enjoy fresh fruits and salads in the summer than it is in the winter.

Maybe the problem started when we started eating fruits and vegetables out of season, I mean the king of comfort vegetables, Pumpkin just feels better in winter than in the middle of March right? That’s why I thought for this months recipe I would work on a couple of salads that suit the warm crisp air of Spring.

I can’t promise you warmth, but these salads are definitely fresh and crispy. I combined a couple of them in a tortilla wrap with the vegan ranch dressing last night…amazing! I didn’t miss meat or cheese at all.

So here to start the Spring Salads Series off is Fennel. Fennel with its aniseed like flavour is a great source of calcium, magnesium, phosphorous, folic acid, vitamin C and potassium. It also helps with digestion (particularly that of fat…yay!), stomach cramps and freshens breath.

Fennel Salad

  • Servings: 4-5
  • Difficulty: easy
  • Print

Servings: 3 Prep time: 20 mins

Ingredients:

2 Fennel bulbs, finely sliced length ways

1 large celery stalk, finely sliced (against the grain, ‘V’ shaped slices)

1/2 Cucumber - shredded

Drizzle of Lemon Juice

1/2 cup Pine Nuts - lightly toasted

Toss all the ingredients together, leaving the pine nuts until last as you want them to retain their crunchy texture. You can then drizzle in the lemon juice or stir in the vegan ranch dressing. As I said great in a wrap or as a side dish.


Sushi & Tofu

You might find it hard to believe, but I am not someone who is very adventurous when it comes to trying new foods: I like to stick to what I know. I’ve come a bit further down the line then where I was a few years a go. I never thought the day would come when I would actually enjoy snacking on cold rice which is essentially what I summed up sushi to be. I was first introduced to sushi whilst at university about 12 years ago. My housemate’s girlfriend at the time is Japanese and she would often prepare sushi at the weekend with him. She must have cornered me or something because I went from going in the kitchen to wash dishes to clapping down a ‘scrambled egg mayo’ sushi she had made. I wouldn’t say it was like fireworks in my mouth (sorry it does get better believe me), but my interest was peaked.

The second occasion was probably another 10 years after that, this time it was salmon. But again the whole ‘lets go  Yo Sushi’ vibe didn’t really sit well with me. I wanted cooked food. Until one day whilst hovering around in Sainsbury’s looking for something else, I came across a Sushi Kit. And so I thought, OK if I’m going to get over this fear of Sushi I have to take it on…and make it my own. So I apologise from now to any Sushi lovers, but I have made some adaptations. I am on the bridge, I have yet to cross over to the over side, but I can see the summit…I’m almost there.

Sushi and Tofu

  • Servings: 4 rolls (6-7 slices per roll)
  • Difficulty: medium
  • Print

For this recipe you will need:

250 g Sushi Rice

4 Nori Sheets

Bamboo Rolling Mat

Cling Film

Wasabi Paste (optional)

The method below will assume you have not bought the kit, obviously if you have the kit, you can follow the instructions there!

For the filling, I added the following:

1 Ripe Avocado sliced length ways

1 Red Sweet Pointed Pepper - sliced thinly length ways

1/2 medium onion (grated)

2 cloves garlic (minced)

1 tbsp coconut cream  or sushi vinegar (to add to the rice)

Dash Soya Sauce/ Hoisin Sauce

1 carrot sliced thinly ideally with a julienne peeler 

And for the Tofu

Firm Tofu sliced into 1/2 inch slabs (6 slices on average)

3 tbsp Soya Sauce

3 tbsp Teriyaki Sauce

2 garlic cloves minced

1/2 tbsp honey

Marinating the Tofu

Before anything else marinade the tofu. Place all the ingredients for the tofu in a saucepan and warm gently to release the flavours. Take a rough guess of how much to make depending on how many slabs of tofu you have prepared. Then pour the mixture over the tofu and making sure it is fully submerged in the marinade. Then refrigerate.

Cooking the Rice

Put the rice into a bowl and wash with cold water. Repeat 3 or 4 times and then drain rice in a sieve. Add 330 ml of water and the washed rice to a saucepan. Bring the rice to the boil and simmer for 10 minutes with the lid on. Turn off the heat and leave to stand for 15 - 20 minutes. Do not open the lid!

While the rice is cooking, and this is entirely optional gently stir fry the peppers and carrots in with the onion and garlic and Hoisin sauce. You still want the vegetables to be crunchy, you are simply flavouring the vegetables before adding them to the rice later. Remove the vegetables from the saucepan and allow them to cool completely.

Layering and Rolling

With the rice still warm, stir in the coconut cream or the sushi vinegar if you prefer. Then let it cool down further. Then set up your equipment: on a hard surface place lay out a clean tea towel for stability. Then place the sushi rolling mat with the lines facing horizontally. Following that, cut some cling film so that its slightly larger than the rolling mat (by 1 inch or two). Then take a Nori sheet and place this on the mat also.  Then take some spoonfuls of rice place then randomly over the Nori sheet, and with your fingers spread the rice out until you have a thin layer covering the sheet.

Next comes the layering, I decided on this order: peppers, carrots and avocado, thinking about how it would look once sliced. I also added a slight drizzle of the marinade from the peppers and carrot. The key is to place the vegetables one inch from the edge and then roll the sheet and mat away from you as if you were rolling up a sleeping bag: tucking it in tightly as you go along.

You should leave about 1/2 an inch around the sheet ‘green’ so that you can seal the sushi roll when you reach the end with water if necessary, When you get to the end of the sheet give the sushi a final roll in the mat to even out the shape, the cling film should be fully wrapped around it by this time. Then twist the two end like a sweetie wrapper.  Place each of the rolls in the Fridge. When this is done, place the Tofu in the oven or under the grill for 10-15 mins. By the time the Tofu is ready the Sushi should be cool enough to slice into 1 inch sections.

Serve with wasabi paste, or pickled ginger or soy sauce. Try alternative fillings e.g. crispy salmon and cucumber.