Roasted Pumpkin & Garlic Soup

So this is how you make effortless, tasty and satisfying soup in minutes. Soup doesn’t have to be complicated nor does it need a whole bunch of ingredients to leave your mouth watering for more. I grew up using yellow or red split peas as a base for thick soups. But as the split peas release no flavour of their own, I found myself adding tons of ingredients, and root vegetables which meant more time in the kitchen and less time doing the other things I enjoyed doing.

This soup however is complete in 3 easy steps: roast, blend, boil.

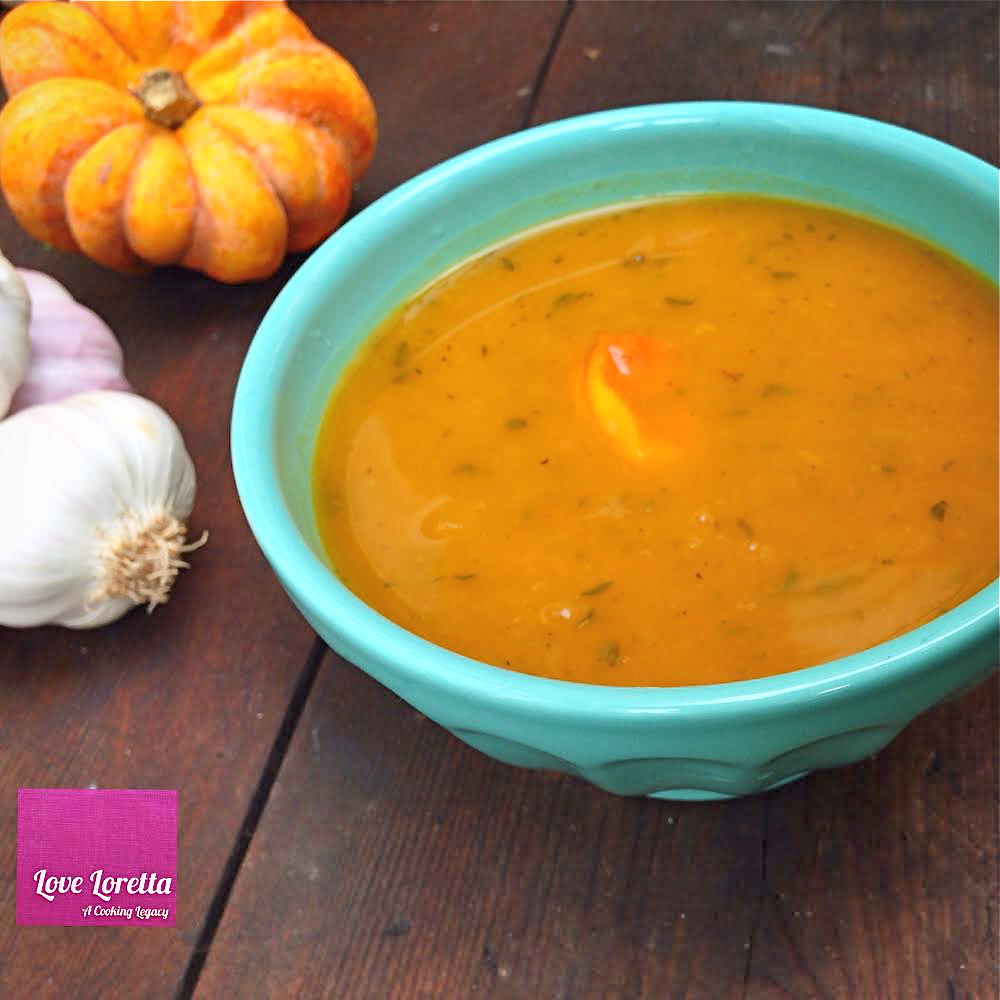
And if you have any left over, it could work as a good based for a pasta dish or stew. The dense sweet nutty flavour of this variety of pumpkin (normally sold in caribbean markets) when roasted needs very little to enhance its flavour more. You can add more or less water to achieve the consistency you want. I think you’re going to really like this one…;-)

Roasted Pumpkin and Garlic Soup

Ingredients:

600g Raw Pumpkin (leave skin on)

Half White Onion

Half Garlic Head (sliced down centre)

Drizzle of Olive Oil

4-5 Sprigs Fresh Thyme

1 Scotch Bonnet

1/2 vegetable stock cube

1 tsp garlic/ ginger paste

Salt/ pepper to taste

1 1/2 cups water

Method:

Pre-heat oven to Gas Mark 8

Place Pumpkin, onion and garlic into a roasting tin and drizzle with oil, salt and pepper. Remove any excess skin from the onion and garlic to reduce burning.

Place in oven for 23-30 minutes or until the pumpkin is tender

Remove the tin from the oven and allow to cool for 15 minutes before scooping the pumpkin flesh, squeezing the garlic bulbs out of its shell and removing the outer skin from the now caramelised onion.

Transfer to a large pot with the remaining ingredients on the list. Boil for 5-6 minutes gently breaking up the vegetables.

Then allow it to cool for 10 minutes before transferring all the ingredients (except the thyme and pepper) into a blender until smooth. Return the soup to the pot and continue boiling for 5 minutes, season to taste and serve!

Advertisement

Sedano al Pomodoro


This has to be the first time I have given celery centre stage in a dish. Most of the time it remains well hidden in a stir-fry, rice or soup; the only indication of its presence being its strong aniseed flavour or the random in-digestible stalk that gets caught between your teeth. But with its firm crunchy texture and fine grooves along its spine, celery ought to be used a lot more like pasta as it can carry a lot of sauce on its back without wilting under the weight.

So here I have created this recipe: ‘Celery in Tomato Sauce’ basically, for the ‘Beat the Bloat’ series I’m running at the moment. All of this week I have been consuming only those recipes that I have mentioned in the series, and along with daily exercise I have to say, I feel amazing! Very refreshed and not ‘full’ to the point of wanting to sleep midday (if there’s any cause for sleep, its this beautiful hot sun we’ve been enjoying lately).

So enjoy this side dish with rice or maybe even spaghetti - the choice is yours!


Sedano al Pomodoro

Ingredients:

8 Celery Sticks - sliced

1 large Tomato - finely chopped

1 tbsp Tomato Paste

2 garlic cloves crushed

1/4 white onion, finely chopped

3 sprigs of fresh Thyme (or 1 tsp dried thyme)

tbsp vegetable oil

3 Anchovy fillets (optional)

pinch of black pepper

Method:

1. Slice the celery and steam in a pot for 2 minutes or until the stalks turn bright green in colour. Then transfer the celery to an ‘ice cold bath’ of water to stop them cooking and to retain their colour.


2. In a frying pan, fry the onion and garlic then add the anchovies and stir them in until they melt. Then add the tomato paste and fresh tomatoes.

3. Stir in the fresh thyme and then gradually add the celery stalks (drained from the water) to the saucepan, stir them in until fully drenched in the sauce. Then add salt and pepper to taste.

Sushi & Tofu

You might find it hard to believe, but I am not someone who is very adventurous when it comes to trying new foods: I like to stick to what I know. I’ve come a bit further down the line then where I was a few years a go. I never thought the day would come when I would actually enjoy snacking on cold rice which is essentially what I summed up sushi to be. I was first introduced to sushi whilst at university about 12 years ago. My housemate’s girlfriend at the time is Japanese and she would often prepare sushi at the weekend with him. She must have cornered me or something because I went from going in the kitchen to wash dishes to clapping down a ‘scrambled egg mayo’ sushi she had made. I wouldn’t say it was like fireworks in my mouth (sorry it does get better believe me), but my interest was peaked.

The second occasion was probably another 10 years after that, this time it was salmon. But again the whole ‘lets go  Yo Sushi’ vibe didn’t really sit well with me. I wanted cooked food. Until one day whilst hovering around in Sainsbury’s looking for something else, I came across a Sushi Kit. And so I thought, OK if I’m going to get over this fear of Sushi I have to take it on…and make it my own. So I apologise from now to any Sushi lovers, but I have made some adaptations. I am on the bridge, I have yet to cross over to the over side, but I can see the summit…I’m almost there.

Sushi and Tofu

  • Servings: 4 rolls (6-7 slices per roll)
  • Difficulty: medium
  • Print

For this recipe you will need:

250 g Sushi Rice

4 Nori Sheets

Bamboo Rolling Mat

Cling Film

Wasabi Paste (optional)

The method below will assume you have not bought the kit, obviously if you have the kit, you can follow the instructions there!

For the filling, I added the following:

1 Ripe Avocado sliced length ways

1 Red Sweet Pointed Pepper - sliced thinly length ways

1/2 medium onion (grated)

2 cloves garlic (minced)

1 tbsp coconut cream  or sushi vinegar (to add to the rice)

Dash Soya Sauce/ Hoisin Sauce

1 carrot sliced thinly ideally with a julienne peeler 

And for the Tofu

Firm Tofu sliced into 1/2 inch slabs (6 slices on average)

3 tbsp Soya Sauce

3 tbsp Teriyaki Sauce

2 garlic cloves minced

1/2 tbsp honey

Marinating the Tofu

Before anything else marinade the tofu. Place all the ingredients for the tofu in a saucepan and warm gently to release the flavours. Take a rough guess of how much to make depending on how many slabs of tofu you have prepared. Then pour the mixture over the tofu and making sure it is fully submerged in the marinade. Then refrigerate.

Cooking the Rice

Put the rice into a bowl and wash with cold water. Repeat 3 or 4 times and then drain rice in a sieve. Add 330 ml of water and the washed rice to a saucepan. Bring the rice to the boil and simmer for 10 minutes with the lid on. Turn off the heat and leave to stand for 15 - 20 minutes. Do not open the lid!

While the rice is cooking, and this is entirely optional gently stir fry the peppers and carrots in with the onion and garlic and Hoisin sauce. You still want the vegetables to be crunchy, you are simply flavouring the vegetables before adding them to the rice later. Remove the vegetables from the saucepan and allow them to cool completely.

Layering and Rolling

With the rice still warm, stir in the coconut cream or the sushi vinegar if you prefer. Then let it cool down further. Then set up your equipment: on a hard surface place lay out a clean tea towel for stability. Then place the sushi rolling mat with the lines facing horizontally. Following that, cut some cling film so that its slightly larger than the rolling mat (by 1 inch or two). Then take a Nori sheet and place this on the mat also.  Then take some spoonfuls of rice place then randomly over the Nori sheet, and with your fingers spread the rice out until you have a thin layer covering the sheet.

Next comes the layering, I decided on this order: peppers, carrots and avocado, thinking about how it would look once sliced. I also added a slight drizzle of the marinade from the peppers and carrot. The key is to place the vegetables one inch from the edge and then roll the sheet and mat away from you as if you were rolling up a sleeping bag: tucking it in tightly as you go along.

You should leave about 1/2 an inch around the sheet ‘green’ so that you can seal the sushi roll when you reach the end with water if necessary, When you get to the end of the sheet give the sushi a final roll in the mat to even out the shape, the cling film should be fully wrapped around it by this time. Then twist the two end like a sweetie wrapper.  Place each of the rolls in the Fridge. When this is done, place the Tofu in the oven or under the grill for 10-15 mins. By the time the Tofu is ready the Sushi should be cool enough to slice into 1 inch sections.

Serve with wasabi paste, or pickled ginger or soy sauce. Try alternative fillings e.g. crispy salmon and cucumber.